August 6, 2020Comments are off for this post.

Divi

Divi is a WordPress theme and visual page builder plugin. Your site might use just one or both combined together to make website building and editing easy and code-free!

Note: If we built a custom website for you using Divi, we might have adjusted the user roles for Editor or lower - learn more here on Divi Role Editor. Login as the Administrator to gain full access.


Core Structure of a Divi Page

Before you start creating or editing it is important to understand the core structure of a Divi page/post. The three basic building blocks are:

  1. Sections (blue outline)
  2. Rows (green outline)
  3. Modules (grey outline/ content elements)

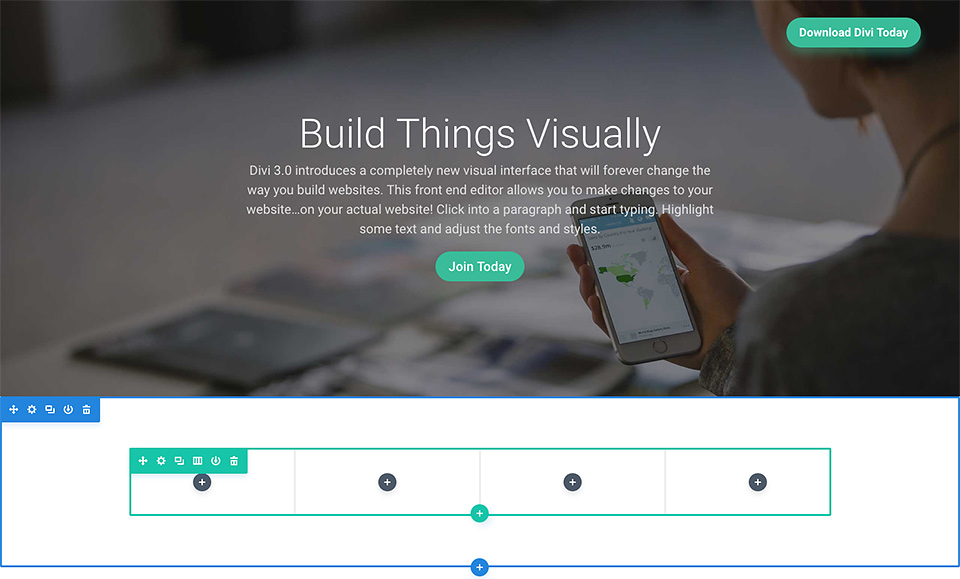
These building blocks must be nested in the order as listed above. "Using these in unison allows you to create a countless array of page layouts."

Sections are the largest building blocks, and they house groups of rows. These are used to create large groups of content, and they are the first thing you add to your page.

Rows sit inside of sections and you can place any number of rows inside a section. Rows are used to house modules. There are many different row column types to choose from. Once you define a column structure for your row, you can then place modules into a desired column. 

Modules are the content elements that make up your website. Every module that Divi has can fit into any column width and they are all fully responsive.

Intro to Divi

  1. Read/watch getting started with Divi builder.
  2. Experiment by trying the live demo and take the guided tour!

Learn More

August 3, 2020Comments are off for this post.

Gravity Forms

A plugin called Gravity Forms is used to power the ‘forms’ on your website. *Only edit forms if you are an advanced user. They have their own documentation and support area (support login was setup with license purchase). Learn more from their Getting Started Guides.


Edit A Form

Go to: Forms > Forms > select form (or create a new one)

Form Editor

This will change the fields that appear to the public on your live website. To add or edit column layouts on your form read this tutorial.

Form Settings

Edit ConfirmationsConfirmations are sent or shown to the user after they have completed a successful form.
Edit NotificationsNotification emails are sent to the designated team members.


Entries

All form submissions are listed here. It is important to review all your form entries from within WordPress often; Learn how to do this. Be sure to delete entries you no longer need (export or download if you require a saved copy). This will help free up storage space and avoid spam. You can also Export all form entries.

Empty Trash

Clean out your trash once a month to reduce storage consumption. When you delete an entry it is first move to the trash area, so that you can restore an item if needed. If you no longer need an trashed entries you can permanently delete it and any associated uploaded files.

Open trash tab > click ‘Empty Trash’

August 3, 2020Comments are off for this post.

MailChimp

MailChimp is a very powerful email marketing service. They have an amazing knowledge base to help you learn how to use it or faq. Please read Getting Started if you are new. Also with a paid plan you will have access to 24/7 support. You can also take a look at these free resources/books from MailChimp to imporve your marketing skills.

Users

Read the details on MailChimp users types here.

Lists, Groups & Segments

You have a paid (or free) account based on subscribers and # of emails sent per month. At launch and then every 1-2 years after it is a good idea to reconfirm the subscribers on your contact list - so that you are paying for only active & engaged readers.

(Login) A look for your ‘lists’ area - this is where all email subscribers are managed. They can subscribe to the list directly from your website or on a mailchimp hosted form.

If you target multiple interest groups, use one list and set up multiple groups within it. When you create a campaign, you can select 1 group from your list, or all of your list to send an email to. Learn more about groups and segments here.

Groups and segments let you filter your list so that users can choose the content or frequency they would like to receive.

If you have a subscribe form embedded on your website - do not ever set up a new List! or else you will need to re-connect it to the website. A new list would only be necessary if you wanted to start a separate business or organization.

Using Templates With MailChimp

Ask Paone Creative to design/ build you preformatted (drag-n-drop) templates to use in your campaigns. You can also setup your own. Templates are used only for the layout of your campaign. They are just the building blocks - do not add the actual content that will be sent out.

You can duplicate the Master Template and then add/ remove content blocks to create more templates. Try to keep your list of templates organized and below 5 different options.

Send A Campaign With MailChimp

This is how you send out emails to subscribers! Here are general instructions on how to setup a regular-old-campaign. You will want to see the notes below on how to setup specific campaign types.

Important Notes

  • Choose a group or segment to send to
  • Use an existing template to start with - add or remove content blocks in the campaign editor (not in the template editor)
  • Be sure to follow spam guidelines
  • Once you have setup a successful campaign > replicate it for the next time you want to send a similar one (rather than starting from scratch). Then edit the content.

RSS Campaign With MailChimp

For an automated daily summary you can setup an RSS Campaign. If this is already setup on your account it will automatically keep sending to the specifications when new posts are published. To edit a live rss campaign you need to pause it (see details here).

August 3, 2020Comments are off for this post.

SEO & Analytics

Rank with Keywords

Remember “pages rank - not websites!” Dedicate your efforts to core pages of your website, to optimize using keywords within your content. This will help them rank higher for your chosen keyword. Do some research to help you choose a keyword to use for your page.

SEO For Images

Yes, images can make a huge impact on SEO. This also helps improve the experience for users with disabilities.

  1. Image file size should be small (optimized to load fast!)
  2. Use your ‘keyword’ within the image file name separated by a dash.
  3. Find your image on the page > edit > Fill out the ‘Alt’ text box (alternative text) with a helpful description of your image (imagine if you could not see the image) & include your keyword.

Yoast SEO Plugin

This is a very popular SEO tool to help you optimize your post & google list view for seo. An editing area will appears in a box below each post. Here are detailed instructions on using this area.

1. Enter a Focus Keyword

Ex: Chocolate Chip Cookies

2. Add an SEO Title

This is the primary title that appears on google. A good pattern to follow is: Enticing Tagline or Title | Focus Keyword | Your Brand Ex: Cookies The Rock | Chocolate Chip Cookies | Your Brand Name

3. Add Meta Description

This must be > 156 characters. It should contain your keyword, brand exciting description and any other related keywords.

4. Test Your SEO Settings

Up near your post publishing buttons, click ‘SEO: Check’ to get a rating on your post. Back down on the plugin box click the tab ‘Page Analysis’ to get tips and insight on how to improve your post.


Analytics

Google analytics is the most popular service for tracking users and behaviour online. If it is installed on your website (very likely) you must visit http://www.google.com/analytics and login with the associated gmail account, to access the analytics data.


Additional Resources

July 31, 2020Comments are off for this post.

Event Tickets

Tickets are provided by a plugin called Event Tickets Plus. To learn more please see their documentation and support area.

Tickets are created and managed on a per post/page basis. Payments and invoices are tracked through the WooCommerce Orders area.

Overview & Tutorial Video

Watch The Video in a New Tab

Ticket Types

Create free tickets: select RSVP
Create paid tickets: select WooCommerce

If a user RSVP’s for a free ticket, they will complete your custom registration form. Then a copy of the ticket details will be automatically emailed to them.

If a user is purchasing a ticket (for a set fee), they will complete the custom registration form and then are sent to the shopping cart for checkout. The checkout process is managed by WooCommerce and connected to your payment processor. Users can enter in a coupon code at checkout or add other items to their cart before paying. Once payment has been approved (order marked as complete) users will be emailed a copy of the ticket.

Manage Attendees

If you would like to collect attendee specific details you can add custom fields to the registration form. These details, along with attendee names are stored on the post/page that is hosting your tickets. At anytime you can review attendees, manage stock or download/export a list of attendees and their registration data.

July 31, 2020Comments are off for this post.

Widgets

What are Widgets

Widgets are used to place repetitive content in the header, sidebar, footer, advertising spots and other unique areas of your website.

1. Widget Areas (accordian boxes with unique location based titles) are located on the right of your screen. These accordian boxes contain the individual widgets that appear on your website. Read about your specific widget areas below before editing.

2. Widget Types (boxes with unique function based titles) are located on the left of your screen. These boxes style the content that appears on your website. Read about your specific widget types below before editing.

How To Edit Widgets

Go to: Appearance > widgets

Edit an active widget

  • Click within the widget area
  • Then click within the desired widget type to expand and edit the fields.
  • *Save when done.

Add new widgets

Drag a widget type from the left into a widget area on the right.

July 31, 2020Comments are off for this post.

WooCommerce

WooCommerce is a very powerful and popular e-commerce tool and has its own resource guide and support area. We use WooCommerce for a variety of reasons but most of all for the flexibility it offers. You can sell products of your own or affiliate, sell tickets, manage inventory, offer coupons, sell memberships, track orders, record sales, manage users and so much more.

Getting Started WooCommerce Docs

Overview of All Areas
Managing Order
Coupon Management
Refunds

July 31, 2020Comments are off for this post.

Bulk/Batch Image Editing

If you have a large blog post, gallery or slideshow it is nice to save your images at the same size (dimensions). This makes the user’s experience more enjoyable. You can also use this method to batch rename a folder of image files. Download & learn how to use QuickScale to bulk prepare images for a blog post.

Step 1: Gather all the images you want to use in your post.

Gather a copy of your images in a folder or place of easy access. At this stage is it ideal to use high resolution images.

Step 2: Use Canva or Photoshop to create the Featured Image & Slideshow Images

The post’s featured image and slideshow images must be uploaded to the website with specific dimensions (see your image dimension chart for sizes & templates). Create and save these new images and add them to your collection of images that you will bulk process for the blog post.

Step 3: Drag/ Drop all images into QuickScale

Drag and drop the featured image, slideshow images and image that will appear in a list of the blog post. Then use the following settings to bulk export all images:

  1. Resize method:
  2. Width:
  3. Height:
  4. Percent:
  5. Save As: JPG, quality 80% (adjust if needed)
  6. (bottom right) set to ‘export images’ then hit START!

Step 4: Bulk rename all images & save

The screen will pop-up to choose a location to save your images. At this time you can also bulk rename the images. Use your ‘focus keyword’ for seo (Search Engine Optimization). Follow these settings:

  1. Choose where you want to save your images
  2. Custom Naming: select ‘custom name’
  3. Index: set to 3 digits
  4. Beside ‘index’ type your focus keyword (or new file name). It will show you a preview below. There is no need to ‘add token’.
  5. Hit EXPORT!

It is very important to give your images proper file names. Do not use a random selection of letters and numbers. The name MUST NOT include any !@#$%^&*()| and most importantly no ‘.’ periods (except at the end of the file name). Consider using your focus keyword in your file name or something descriptive that google can search.

Step 5: Review images and file sizes

Review your images. If the file size is over 200kb then it is best practice to compress them (ideal image size is under 100 kb). Go to the TinyPNG website, upload your images and download the new and reduced file. No loss of image will occur - it will just compress the file size.

Contact
[email protected]
Based in Vancouver, Canada

Contact Us
[email protected]
Based in Vancouver, Canada

Contact Us
[email protected]
Based in Vancouver, Canada

       
© 2017 Paone Creative | Privacy Policy

© 2017 Paone Creative | Privacy Policy

 © 2017 Paone Creative | Privacy Policy